
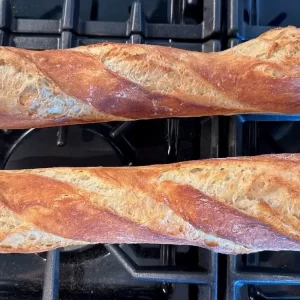
I have been known to make homemade baguettes. A lot. People seem to swoon over my fresh bread. “YOU Made THIS?” is a quite common response. Yes, it’s SUPER easy I say. I mean it’s REALLY easy… You TOO can make these homemade baguettes in no time at all… The ingredient list is super short so you can get going quite easily. Most homes already have flour in the pantry and salt in the kitchen, don’t they?
Hubster and I literally discussed it a few days ago. Of all the people who swoon over my bread – I have only 1 friend who has actively taken up bread baking with me. And that sorta started because her hubby went drunken shopping (online) one night and bought the same bread machine as me – so she could get the exact recipes and exact results. haha. But now she makes the BEST sourdough bread ever – and I had to get HER recipe from her. But I digress. We’ll save the sourdough for another day.
We are doing baguettes today…. Who wants to learn and make baguettes with me?
This recipe couldn’t be easier:
Literally the directions for this recipe:
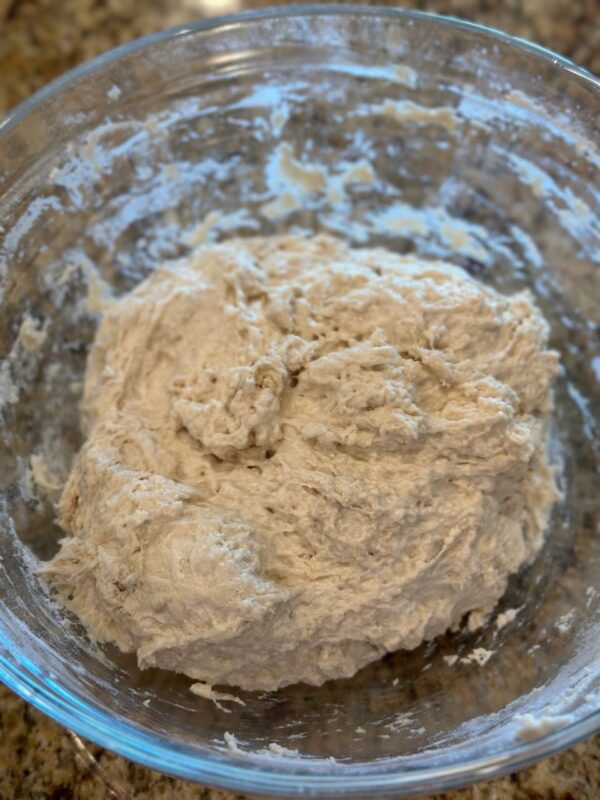
- Put flour, salt, warm water, yeast and maybe diastatic malt powder in a large bowl.
- Stir to mix completely.
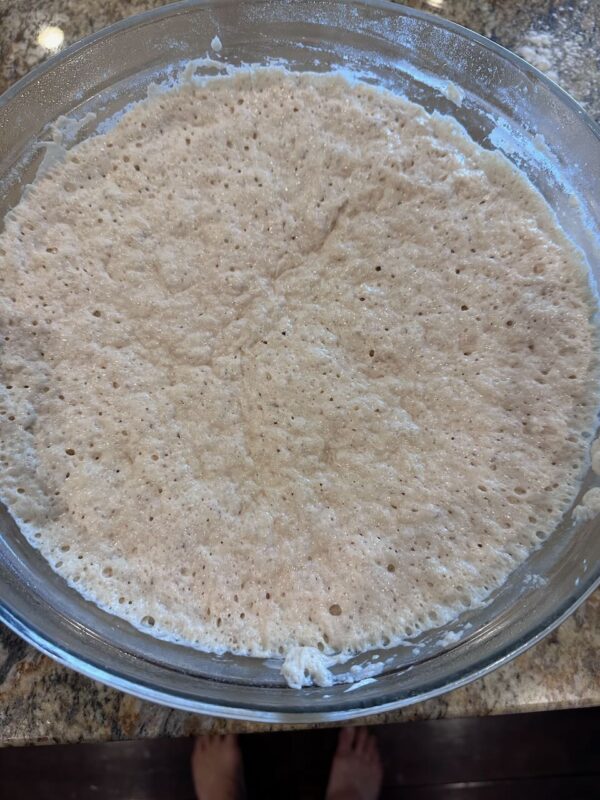
- Cover and let rise for 2 hours. Dough should double.
- Tightly cover the dough and put it into the fridge for minimally 1 day. (The longer the refrigerator fermentation the more sour dough-ish the flavor. Probably my sweet spot is between 1 day and 3 days before I bake off the first 2 loaves. Hubster likes the baguettes more, the older the dough is. I don’t ever keep the dough more than about 10-12 days. If it gets close to being 2 weeks since you put it in the fridge get that dough out, shape it and bake it.)
- Get the dough out, shape it and bake it.
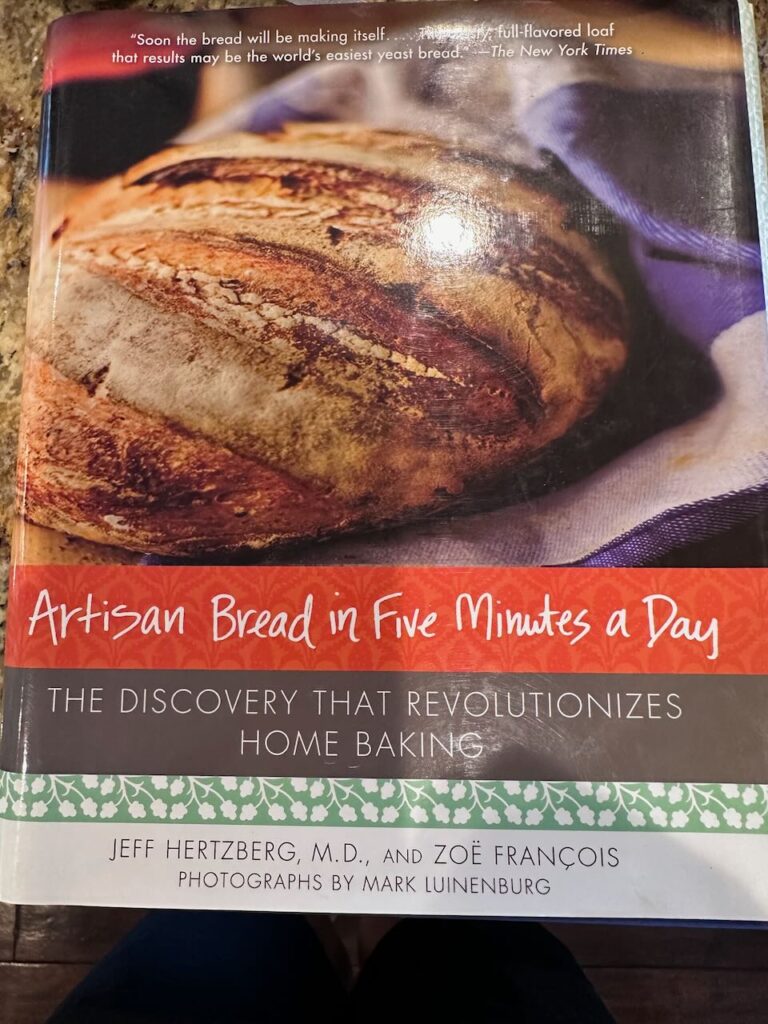
Honestly – it’s that easy. I got the below book a long long time ago. I mean who doesn’t want bread after only working 5 minutes a day ? This original recipe was found in the book shown below and can also be found online here.
Why are people Intimidated by Yeast ?
I honestly do not know why people are intimidated by homemade bread baking. You shouldn’t be. Ain’t NO ONE EVER going to say – this homemade bread is too ugly for me to eat. Especially if the house still smells like fresh baking bread… People have eaten slightly burnt, slightly and seriously misshapen bread and been HAPPY about it!
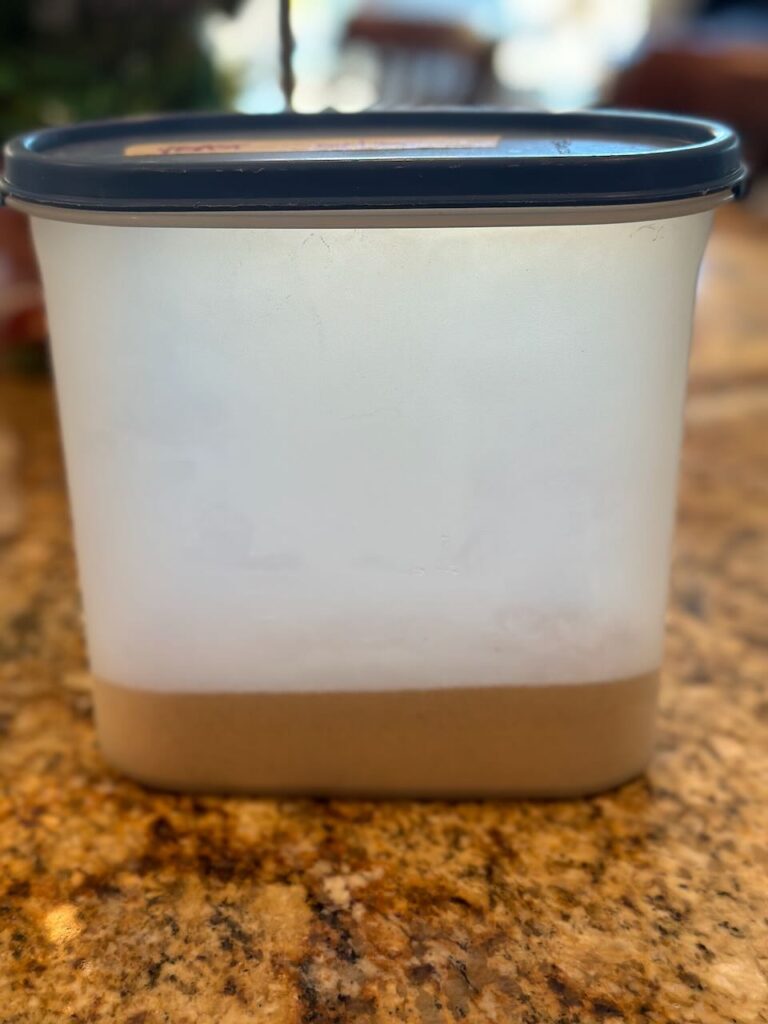
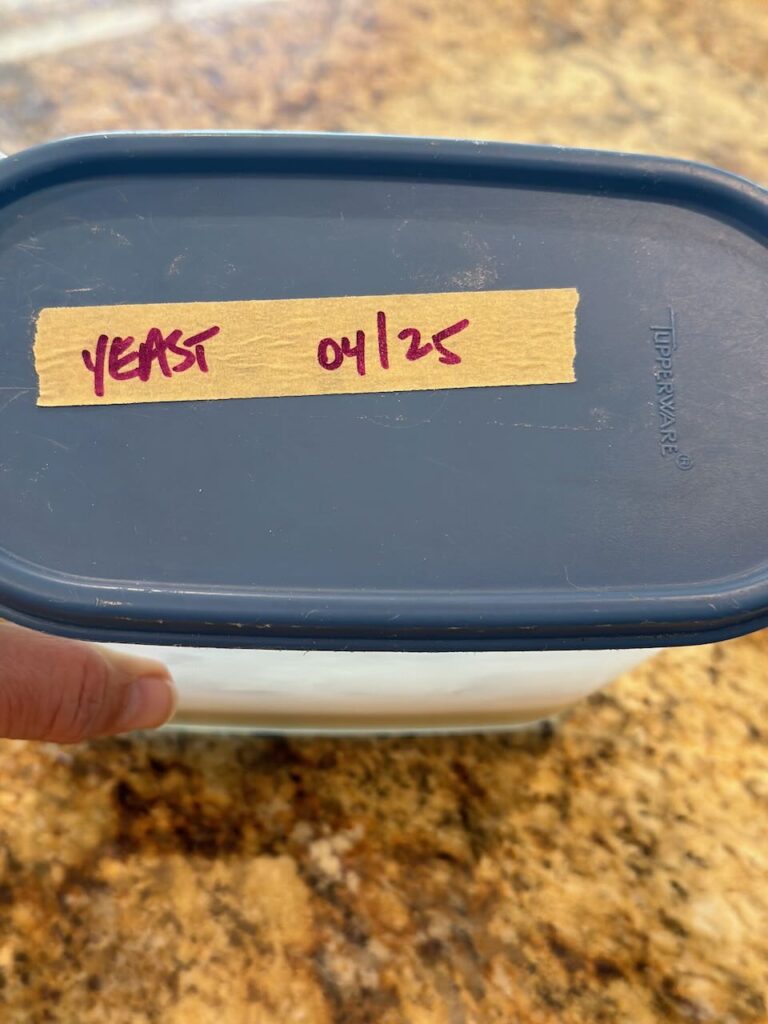
I do recall having yeast that didn’t ferment properly once or twice. Maybe that is why people keep away from bread? You can readily avoid that problem by keeping track of your yeast. When I get my yeast open I dump it into a Tupperware, write the expiration date on top – and pop the whole container into my fridge. I do use a fair amount of yeast – and honestly – would encourage you to buy the pound of yeast and do the same. It will save you frustration and those little packets in the grocery are not cost effective. A pound of yeast is appx $10 – and that’s more baguettes than you should eat. Ha. Better call some friends, or have a bunch of kids to feed…
Speaking of kids… You should NOT be intimidated by bread or yeast. At the end of this month I have plans to teach two of the cutest little girls how to make baguettes. They are 8 and 7. If they can do it…so can you !
So So So Simple !
You do need a few other tools and ingredients:
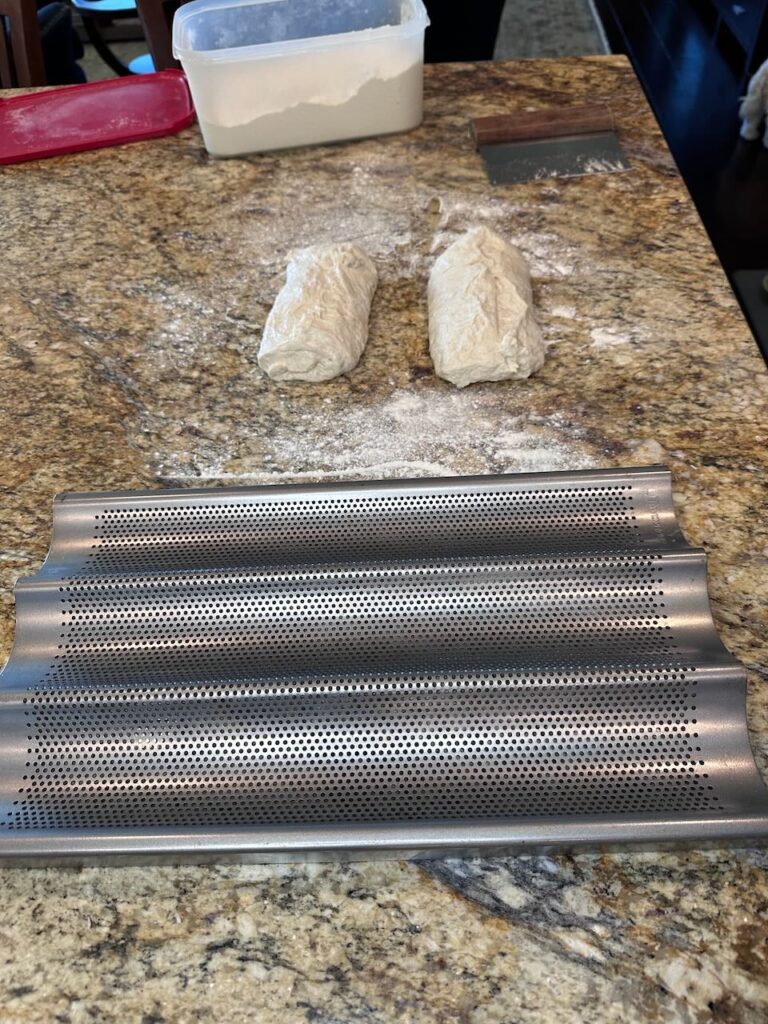
You need a baguette pan:
I have two baguette pans – I like to bake my 2 baguettes on the outside of the three baguette pan (see picture). So if I’m making 4 baguettes, which my recipe makes standard, I’ll get out both pans. You probably should just start with one pan and plan on making between 1 and 3 loaves at a time.
You can get a pan on Amazon – I recommend the Chicago Metallic Perforated Baguette Pan – they used to be like $11 – but are now $24? Sheesh.
If you are needing the whole kit and caboodle (yeast / flour / pan etc.) you could get everything from King Arthur Flour (KAF) – you will get a bit higher quality but you will pay a bit more…. Their pan is specially made for them with steel (strength) and aluminum (heat conductivity) so I imagine it will last a whole lot longer and perform better than the Chicago Amazon product. A link to the KAF pan is here.
You need Parchment:
Have you ever seen a grown woman cry over spilt milk baguettes that raised THROUGH the holes on their baguette pan and then baked and rose even more through those tiny holes when the baguette entered the oven? I had (err I mean, my friend had) beautiful looking baguettes that were essentially BAKED INTO the pan and were not coming out for nothin’. Then a knife was pulled out – trying to cut the baguette off the pan and somehow ‘save’ the baguette – the pan was scratched – and it turned into a major sh*t show. Learn by reading – not by doing…
Get yourself some parchment.
My friends at KAF also sell Half Pan Parchment Sheets if you want to take the super easy road. That link is here.
Now days I buy my parchment at Costco. Yeah, I bake more than most.
Also – if you are not using sheets that are flat and have a rounded roll of parchment you may benefit from a quick read (from my Kitchen Tips Category) : Why Crinkling Parchment is a thing…
Diastatic Malt Powder:
This ingredient is not necessary but comes highly recommended by me. And here’s why. A few friends were over – we were having a pot luck dinner, as we do. A friend tasted the bread that I made and said – wow – this is even better than normal. Did you do something different?
Uhm, yes I did. I was surprised that she could tell the difference. That was the pivot point when I realized that diastatic malt powder is needed every time I make these baguettes! I added 2 Tsp of Diastatic Malt Powder to the recipe. The bread texture is a smidge different and obviously the taste is slightly different.
But I also have visual proof. Same recipe / same oven – one with and one without Diastatic malt. They say you eat with your eyes first. Which baguette are you going to reach for?
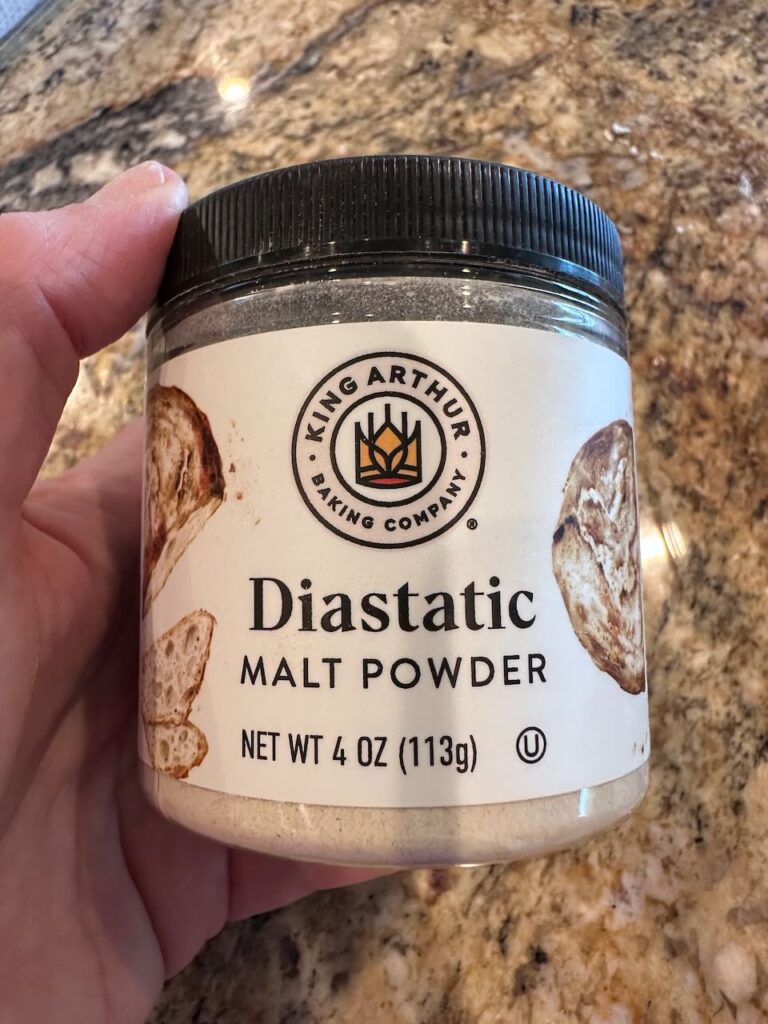
Of course, my scientific baking friends at King Arthur turned me onto the Diastatic malt – and here I am turning all of you onto it. If you want some of this Diastatic Malt – a KAF link is here.
Flour:
The basic recipe calls for AP – All Purpose Flour. You can use that – or you can use a mix of AP and Bread Flour. Bread flour has more protein and results in more ‘structure and chew’ in the crumb. Think of the difference between thick crust pizza dough chew vs. a cake or pastry bite – which should be light and definitely not chewy.
Originally I used all AP flour. Now, sometimes I use all bread flour. Sometimes I blend my flour when making baguettes. Some AP / Some Bread flour. If I have bread flour that is nearing the end of its life (expiration date) I’ll use all bread flour. It’s really up to you. Hopefully you will experiment and decide which way you like your baguettes best. More bread flour / even of each / all AP…
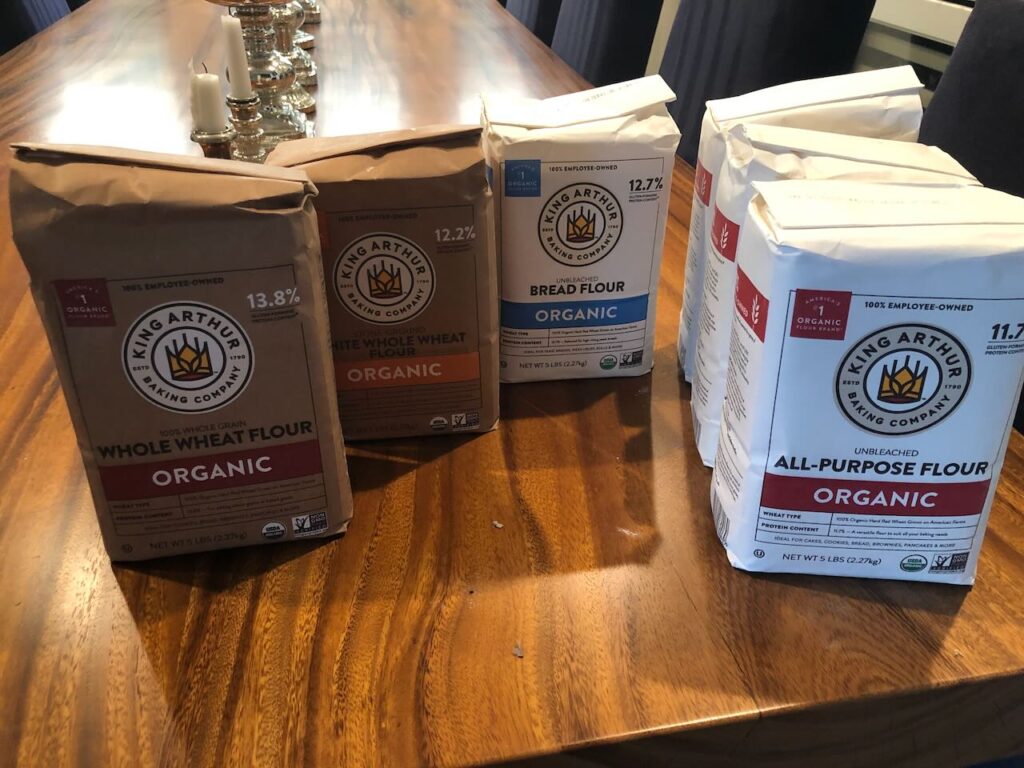
I was getting my KAF flour at Target –> It was so cheap at something like $3.99 for 5 Lbs. It was even cheaper at Target than buying it online direct. Now it’s $7.19 at target which is just slightly more than getting it online ($6.95) with KAF…. So if you can get a coupon / free shipping it’s easier to buy it online if you don’t need it immediately.
If you are going all in on the KAF – for the diastatic malt – you may as well see about getting your flour direct from KAF too. They have both organic and ‘regular’ – sometimes I get some of each… depending on what is going on.
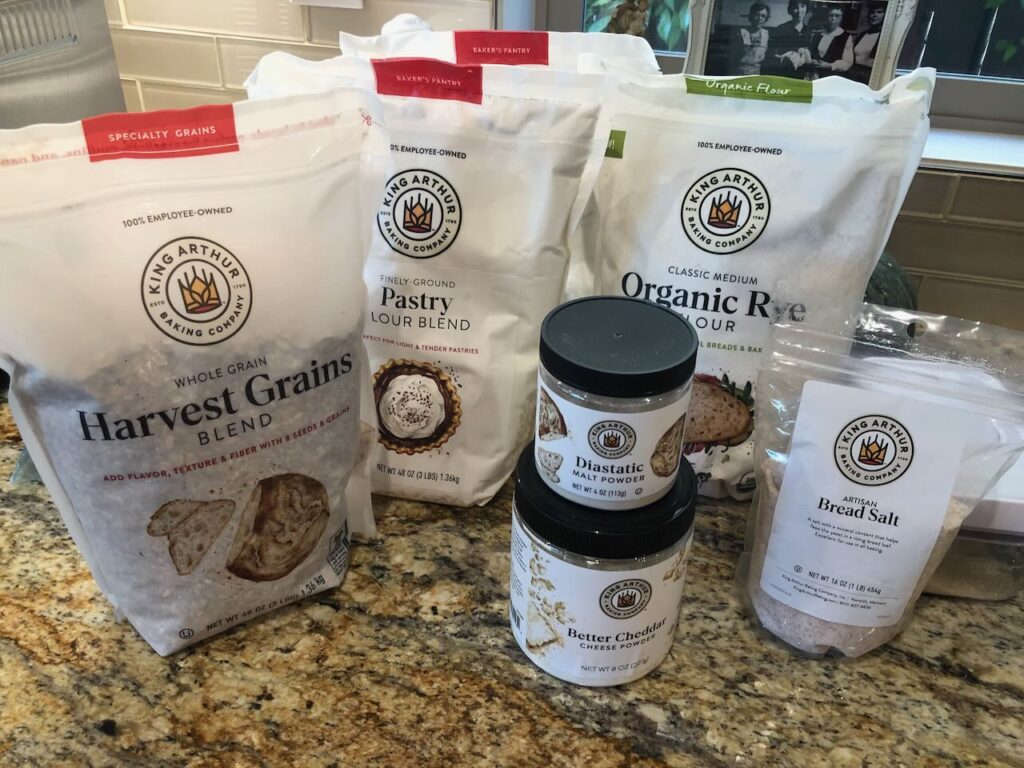
Please know that I’ve been a big King Arthur Flour (KAF) fan for more than 15 years already. They really do have great products and many awesome recipes on their site – many of which I’ve baked and continue to bake. I’ve even called their help line a few times when a recipe wasn’t clear to me or needed help and they were wonderful… Here are pics of a pre-xmas purchase a few years ago… That’s about 35 lbs of flour + a few specialty products. 😁
Salt:
Salt is a key ingredient to bread – and really all baking. I know that is a peculiar thought the first time you really think about adding salt to baked goods. But as with all things – salt brings out the flavors of whatever else you are cooking or baking. You need just a pinch. Or, more than a pinch if baking 4 loaves…. 😉
If you look at the picture above, on the left, you will see BREAD SALT on the right of that picture. Of course once I read about KAF having BREAD salt, I had to try it. They now sell that salt in a plastic canister – and that link is here. They say it’s artisanal bread salt – taken from the depths of the earth (ha) but it includes minerals yeast needs to thrive. I believe there is something to that…
I buy Pink Himalayan salt from one of the cheapo stores by the 2 lb bags or more… (think Marshalls / Home Goods / TJ Max). I figure there’s similar minerals in the Himalayan salt as in their salt.
Maybe ?
You could also use regular old table salt – which I did for years…
Yeast:
There are two key types of yeast we use now days, the first is instant and the second is active dry. Instant is the most commonly used – and what I purchase. If you buy the active dry yeast – no worries – it will just take some extra time for the bread to rise and proof. As a general principle you should focus on whether the bread has doubled – and worry much less about the amount of time the recipe says that it will take.
Note: weather conditions (humidity), location (elevation), temperature of your home, and density of your flour measurements etc – will all affect how quickly your bread rises. Just be patient and let the bread tell you when it’s doubled – not the clock.
Whether you get the packets or a jar in the grocery or the pound online- check the expiration date. I tend to trust the grocery store yeast less. Not sure if that is rational or not. I really trust the amazon or the KAF one pound vacuum sealed yeast. They have a produced date and an expiration date and the vacuum seal makes me believe the yeast hasn’t spoiled. You can get a pound of yeast from KAF from this link. (Instant is my recommendation)
Make sure to put your yeast into the fridge – in a container if it doesn’t come in one. I’ve also read that you can put your yeast into the freezer all the same too.
If you are ever concerned that your yeast may not still be alive you can test it. Put some warm water (like a hot bath) into a measuring cup – add a tsp of sugar and a tsp of yeast and wait 5-10 minutes. If the water is bubbling and frothy and a strong smell of yeast then your yeast is still active.
Affiliate Links and My love for KAF:
I know this post contains a lot of links for KAF. It’s a baking post – so … there’s really not getting around that… it is likely to happen. When I made a list of which affiliates I ought to have for my blog – there were really only a handful of companies that I thought I’d add. Top three include King Arthur Flour, Spices (currently pending), and American Wagyu steaks – Snake River Farms (SRF). These are the premier vendors I use to supply my house with key ingredients for cooking / blogging.
Please know and trust me that I will only support and provide links for programs and products I personally use and love.
If you buy your flour or need other things from KAF – I would appreciate it if you used my links. At no additional cost to you I get a slight commission on any purchases you may make, using my links. Any purchases will further support my blog / website if you used my links. 😘
Now let’s get down to business!
Easy Homemade Baguette
Equipment
- Parchment Paper
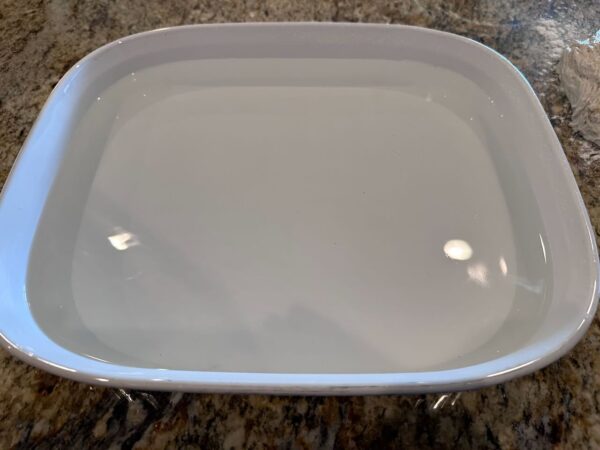
- Large Casserole Pan – will be used to provide steam in the oven
Ingredients
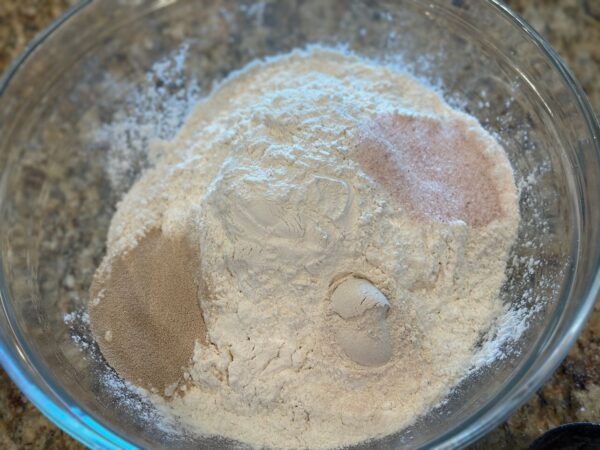
- 6½ C Flour – can use AP or Bread Flour or a combination
- 1½ Tbl Yeast
- 1½ Tbl Salt – Ideally Himalayan Salt
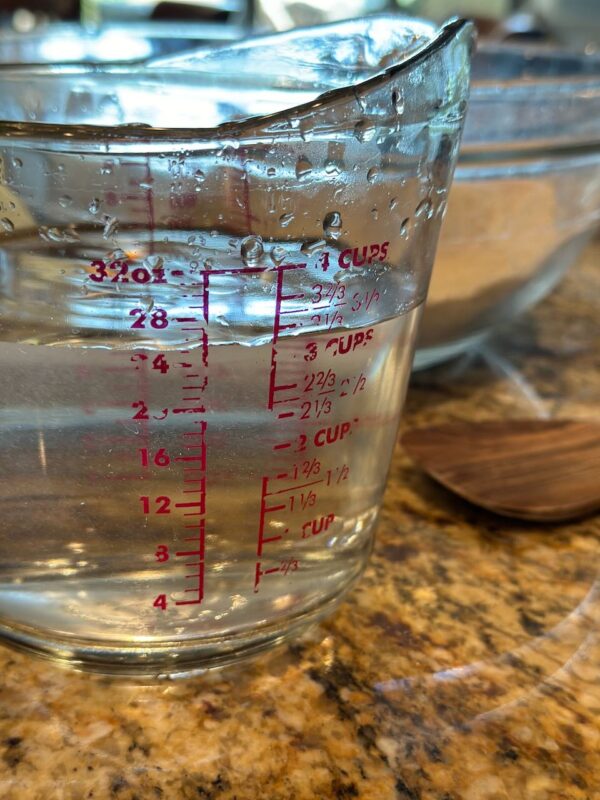
- 3 C Warm Water
- 2 tsp Diastatic Malt – Optional – but recommended
Instructions
Make the Dough – 1st Day
- Get your ingredients ready.

- Get out a large bowl. Add Flour, Salt, Yeast and Diastatic Malt.
- Get out a large measuring cup to microwave 3 C of Water. Otherwise heat or microwave 3 C of water. IMPORTANT the water needs to be the temperature of a nice warm bath. Stick your finger into the water. If you think the water is too warm, so will the yeast. If the water is TOO HOT – the yeast will die. You could always use a food temperature gauge – you want the water to be about 110℉.
- Mix the water into the other components – stirring until everything is well combined. You do not need to knead the dough.
- Cover the dough, let rise till doubled – two hours.
- Once the dough has risen – tightly cover the dough (plastic wrap?) and put it into the fridge for at least a day.
On First Baking Day I typically make 2 loaves at a time.
- Get out a large oven safe casserole pan and fill with HOT water and place in the oven – bottom rack. Putting in HOT water will make the oven work less hard – to bring the contents up to temperature.
- Heat the oven to 450℉.
- Remove the dough from the fridge. I release the edges of the dough by using my fingers and breaking the edge connection. This may not be needed, but it's what I do…

- Put a little bit of flour onto the counter and then dump the dough onto the counter.
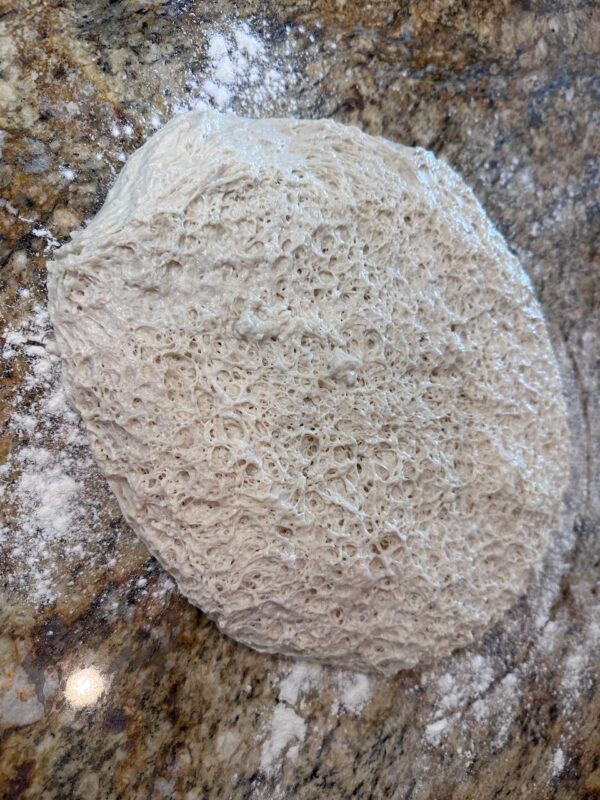
- Get a smaller bowl, cut the dough in half as best as you can figure, and put the remaining dough back into the fridge, well covered, for another baking day.
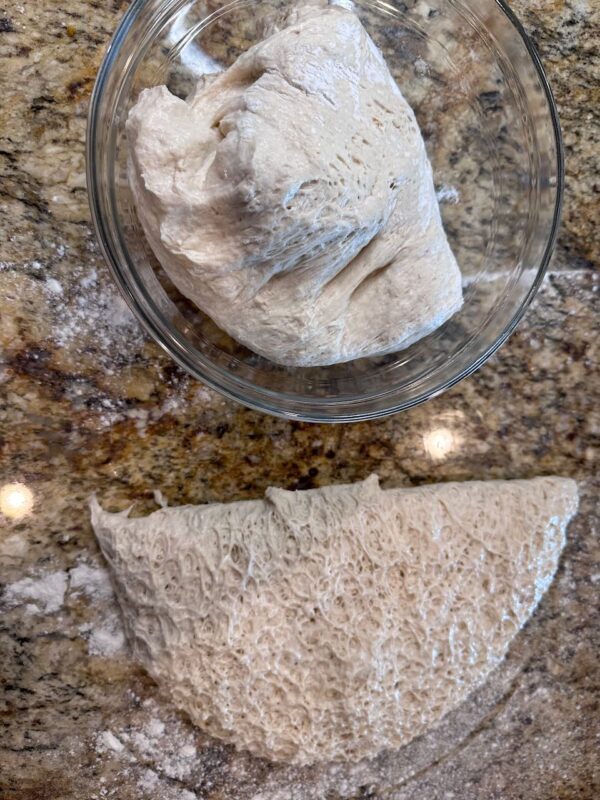
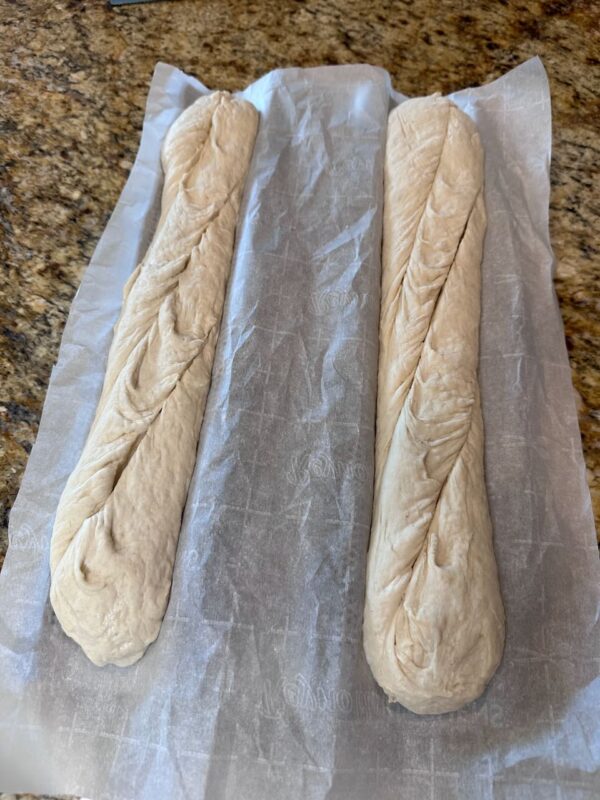
- Split the 1/2 of the dough on the counter into 2 portions using a bench knife. Be gentle with the dough and form it into a mini log. As you work with the dough – try not to press down too hard and release all of the air bubbles. The most prized baguettes are those with plenty of air holes once baked.

- Put a slight bit more flour on the counter – and proceed to roll the mini log using your palms from the center of the dough to the outside of the dough – gently making the dough longer and thinner. Continue this gentle rolling / pulling motion until the dough is appx as long as the baker. Reminder – it doesn't need to be perfect. It needs to be longer and thinner than when you started. See the pics.
- Get your baguette baker out – and cover with parchment. Crinkle the parchment and then un wrap and lay it flat over the baker.
- Place the formed log of dough onto the parchment.
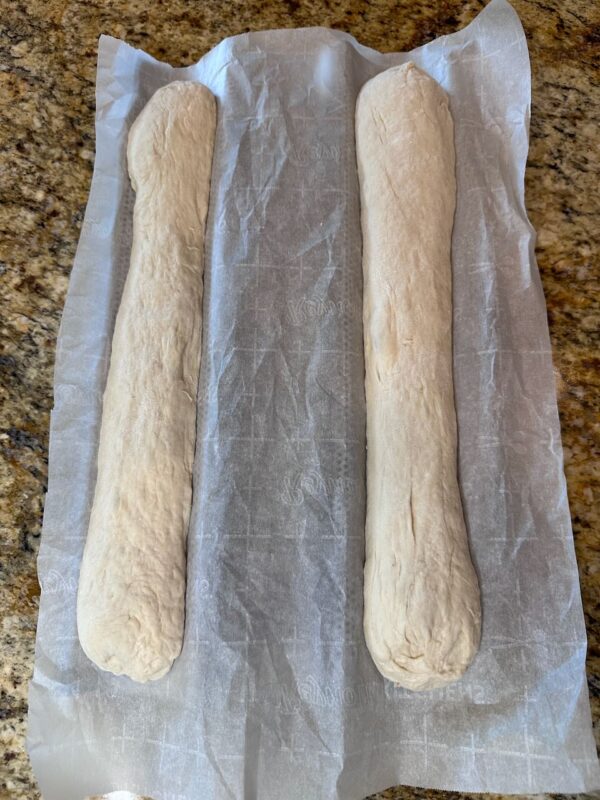
- Roll the second dough similarly with your palms to the proper shape.
- Let the bread come to room temp while the oven is pre-heating. I typically find that my oven takes about 30 min to get warm – and by then the baguettes are sufficiently warm as well.
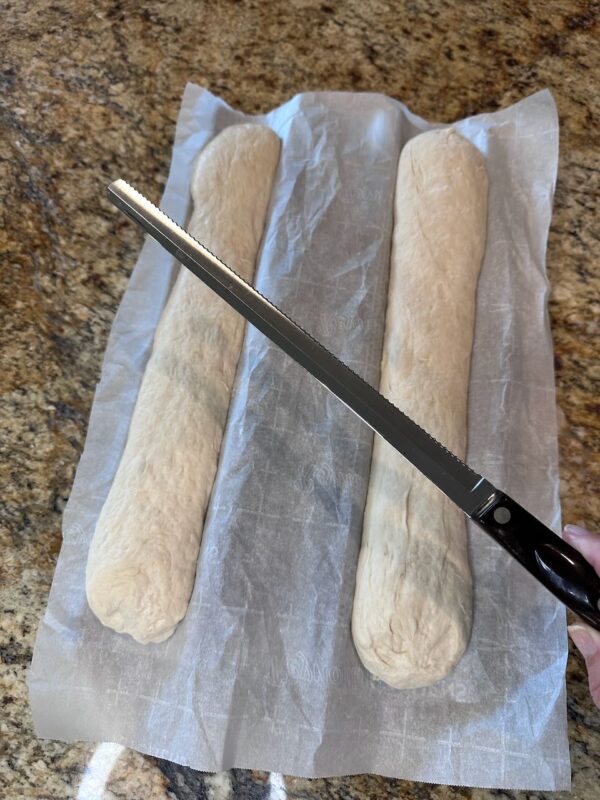
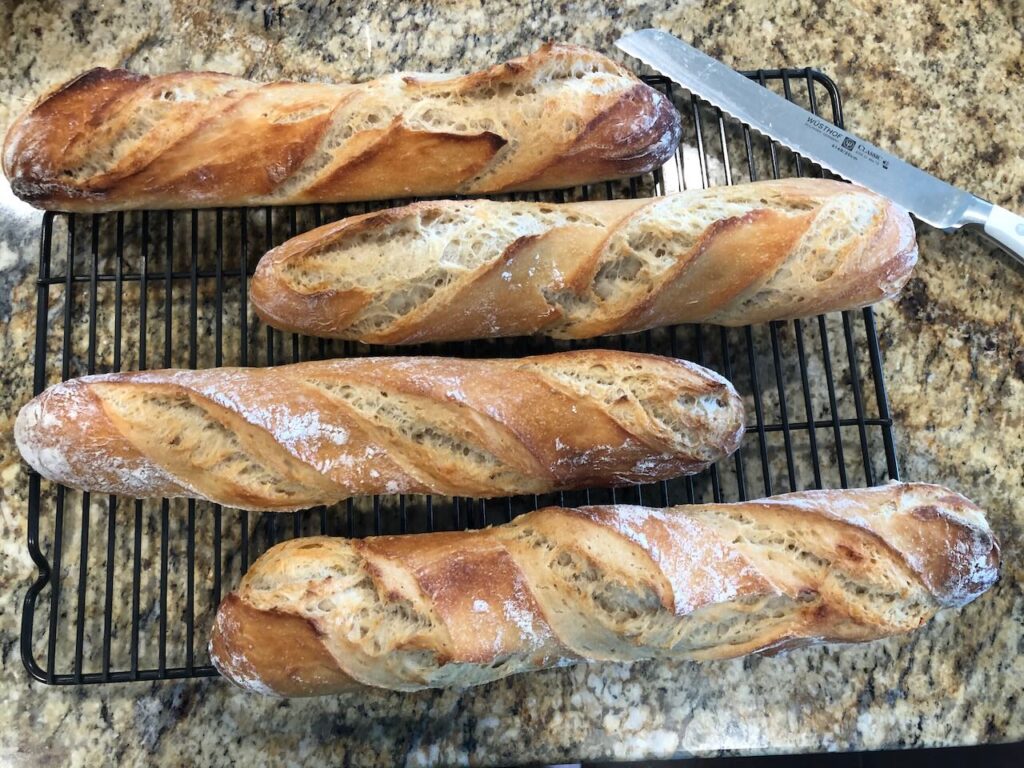
- Using a sharp serrated knife – or a bread lame – cut the loaves fairly deep (about half way through dough) – with 3 cuts each.
- Place the bread into the oven just above the 'boiling' water and bake for 25 -27 minutes. I most always take the bread out at 25 or 26 minutes. Your oven may vary…
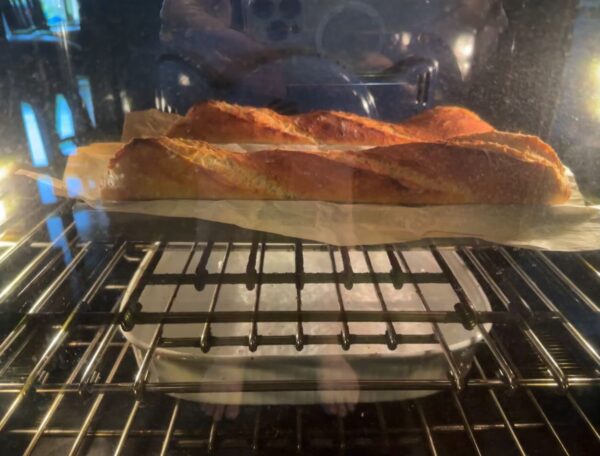
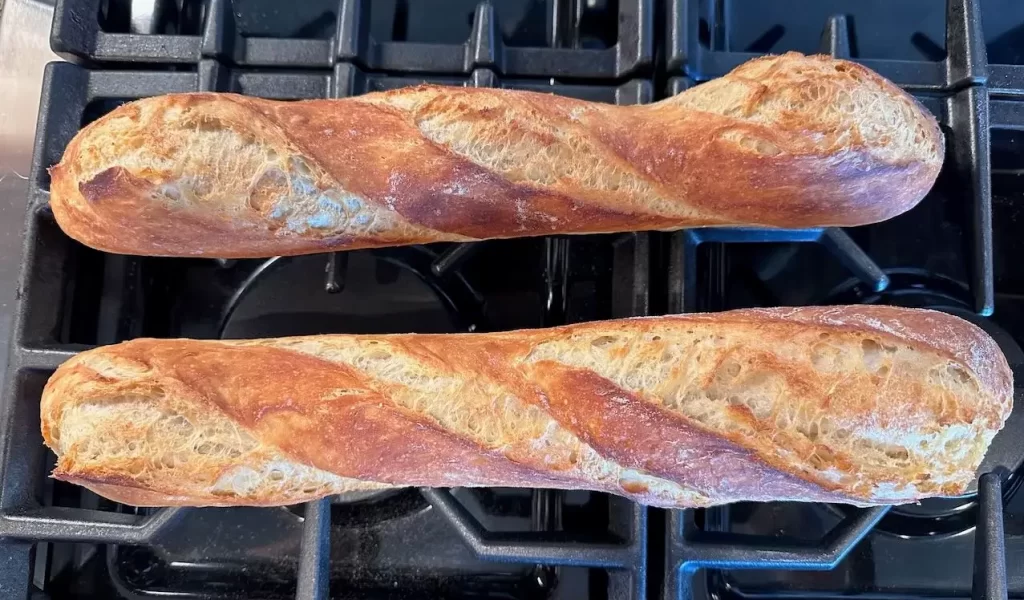
- When the bread is brown and looking done… take it out of the oven and remove the bread from the pan and the parchment. I let my bread cool on my stove top. You can use a cooling rack if you like. (If you leave the bread on the tray / on the parchment as it cools it will release steam / heat that will condense on the parchment and make the bottom of your bread soggy. You don't want that!)

Second Baking Day
- Repeat usage of water bath.
- Repeat Oven Preheat.
- Repeat flour counter / shape dough / parchment / baguette baker
- Rest 30 + min till oven is ready. Slash bread. Bake. Cool.
Much appreciated!
Wow. Super easy is not a simple enough explanation. I always wanted to make baguettes but I was never good at making bread. Well. I’ve made this recipe twice and it’s been an astounding success. It’s foolproof!
Sam – thank you so much for taking time out to not only try my baguettes but to share your feedback. So glad this worked out wonderfully for you!